Spring底层核心原理

Spring源码分析,Spring全链条理解Spring的源码,先从宏观的角度认识下Spring

Posted by Sunfy on 2021-09-04
Words 4.6k and Reading Time 18 Minutes
Viewed Times
Viewed Times
Visitors In Total

Spring如何创建一个对象

首先来看一个类org.springframework.context.support.ClassPathXmlApplicationContext

这个类就是我们一开始使用Spring的时候会首先认识的一个类,在Spring 3的时候增加了一个org.springframework.context.annotation.AnnotationConfigApplicationContext, 经常使用Spring的人都应该知道第一个类的作用,创建了spring的容器,并指定了扫描路径。其实这两个类的作用基本相同,只不过在一些具体形式上有一些区别,比如前者主要是去读取指定路径下的xml配置文件,后者则是通过java配置类的形式去配置Spring容器。

1
2
3
ClassPathXmlApplicationContext context = new ClassPathXmlApplicationContext("classpath:spring.xml");

AnnotationConfigApplicationContext context = new AnnotationConfigApplicationContext(MainConfig.class);

这里之所以提及AnnotationConfigApplicationContext,是因为我们目前主流使用的SpringBoot就是基于这个类来实现的。

通过以上代码后,我们通常就可以使用context容器对象通过getBean方法去获取对象,在这个过程中就创建了Bean对象。那接下来就了解Spring是如何创建一个对象的。

那么此处有一个问题可以思考下:通过Spring容器获得的Bean和java中new xxx得到的bean有什么区别呢?

Spring中bean的创建生命周期

xxx.class —> 判断使用哪个构造方法 —> 普通对象 —> Aware回调 —> 依赖注入(属性赋值@Autowrite) —> 初始化前(@PostConstruct) —> 初始化 ( InitializingBean)—> 初始化后(AOP) —> AOP之后会生成一个代理对象 —> Bean

  1. Spring扫描class得到BeanDefinition
  2. 根据得到的BeanDefinition去生成bean
  3. 首先根据class推断构造方法
  4. 根据推断出来的构造方法,反射,得到一个对象(暂时叫做原始对象)
  5. 填充原始对象中的属性(依赖注入)
  6. 如果原始对象中的某个方法被AOP了,那么则需要根据原始对象生成一个代理对象
  7. 把最终生成的代理对象放入单例池(源码中叫做singletonObjects)中,下次getBean时就直接从单例池拿即可

依赖注入

伪代码

1
2
3
4
5
6
7
// 通过car对象获取其属性,并遍历属性中查找带有Autowired注解的
for (Field field : car.getClass().getFields()) {
if (field.isAnnotationPresent(Autowired.class)) {
// 给属性进行赋值(赋值的值从何而来???)
field.set(xxxx, ????)
}
}

初始化前

@PostConstruct注解,初始化前调用,可以对bean进行一些赋值工作,使用和依赖注入类似

初始化

判断当前bean是否实现了InitializingBean, 通过 instance of InitializingBean判断是否实现接口,实现了该接口后,就将当前bean转换成InitializingBean对象,然后通过该对象去调用实现接口需要重写的afterPropertiesSet()方法

Spring源码中对用的位置 AbstractAutowireCapableBeanFactory.initializeBean(String beanName, Object bean, @Nullable RootBeanDefinition mbd)

1
2
3
4
5
6
7
8
9
10
11
12
13
14
15
16
17
18
19
20
21
22
23
24
25
26
27
28
29
30
31
32
33
34
35
36
37
38
39
40
41
42
43
44
45
public abstract class AbstractAutowireCapableBeanFactory extends AbstractBeanFactory
implements AutowireCapableBeanFactory {
protected void invokeInitMethods(String beanName, Object bean, @Nullable RootBeanDefinition mbd)
throws Throwable {

//判断我们的容器中是否实现了InitializingBean接口
boolean isInitializingBean = (bean instanceof InitializingBean);
if (isInitializingBean && (mbd == null || !mbd.isExternallyManagedInitMethod("afterPropertiesSet"))) {
if (logger.isTraceEnabled()) {
logger.trace("Invoking afterPropertiesSet() on bean with name '" + beanName + "'");
}
// Spring的安全管理器
if (System.getSecurityManager() != null) {
try {
AccessController.doPrivileged((PrivilegedExceptionAction<Object>) () -> {
((InitializingBean) bean).afterPropertiesSet();
return null;
}, getAccessControlContext());
}
catch (PrivilegedActionException pae) {
throw pae.getException();
}
}
else {
//回调InitializingBean的afterPropertiesSet()方法
// 这块就是上述关键的位置
// 这块就是上述关键的位置
// 这块就是上述关键的位置
((InitializingBean) bean).afterPropertiesSet();
}
}

if (mbd != null && bean.getClass() != NullBean.class) {
//我们beanclass中看是否有自己定义的init方法
String initMethodName = mbd.getInitMethodName();
//判断自定义的init方法名称不叫afterPropertiesSet
if (StringUtils.hasLength(initMethodName) &&
!(isInitializingBean && "afterPropertiesSet".equals(initMethodName)) &&
!mbd.isExternallyManagedInitMethod(initMethodName)) {
//调用我们自己的初始化方法
invokeCustomInitMethod(beanName, bean, mbd);
}
}
}
}

大致的过程就是上述的,Spring源码中会比这个更多,支持更多的扩展点,比如AwarebeanPostProcess,就是spring提供的很多的扩展点,以及一些常见主流款框架如何通过扩展点集成到Spring中,见本站链接

手写Spring

本代码中包含了Spring读取配置文件,实现了@ComponentScan注解,读取指定路径下的所有文件。读取所有文件下的Component标记的类。@Scope注解实现简单的单例bean和原型bean。此处的构造方法使用默认的无参构造方法,并 没有实现复杂判断构造方法的功能。生成普通对象后,实现了简单的BeanNameAware扩展点,并实现了基于@Autowrited依赖注入。

实现InitializingBean接口,在创建bean的时候,如果实现了InitializingBean接口,会自动执行afterPropertiesSet方法。

实现BeanPostProcessor接口,bean的后置处理器,两个默认的方法postProcessBeforeInitializationpostProcessAfterInitialization

理解了bean的创建过程,bean从读取class文件、通过ClassLoader进行类的加载、创建BeanDefinition对象、保存类的Scope属性保存至BeanDefinition、将BeanDefinition放入Map缓存中、在获取bean的时候,通过scope不同属性创建bean,并将创建的bean保存至相应的map缓存池中。创建bean的时候实现了依赖注入(属性赋值)、判断Aware接口、BeanPostProcessor后置处理器初始化前、InitializingBean初始化接口、`BeanPostProcessor后置处理器初始化后。

BeanPostProcessor类似AOP的实现过程。

此处只贴出了Application的代码,具体的接口代码就不贴了,那些就是一些注解和接口,很简单,不会的直接从Spring中取一下也可以。

1
2
3
4
5
6
7
8
9
10
11
12
13
14
15
16
17
18
19
20
21
22
23
24
25
26
27
28
29
30
31
32
33
34
35
36
37
38
39
40
41
42
43
44
45
46
47
48
49
50
51
52
53
54
55
56
57
58
59
60
61
62
63
64
65
66
67
68
69
70
71
72
73
74
75
76
77
78
79
80
81
82
83
84
85
86
87
88
89
90
91
92
93
94
95
96
97
98
99
100
101
102
103
104
105
106
107
108
109
110
111
112
113
114
115
116
117
118
119
120
121
122
123
124
125
126
127
128
129
130
131
132
133
134
135
136
137
138
139
140
141
142
143
144
145
146
147
148
149
150
151
152
153
154
155
156
157
158
159
160
161
162
163
164
165
166
167
168
169
170
171
172
173
174
175
176
177
178
179
180
181
182
183
184
185
186
187
188
189
190
191
192
193
194
195
196
197
198
199
200
201
202
203
204
205
206
207
208
209
210
211
212
213
214
215
216
217
218
219
220
221
222
223
224
225
226
227
228
229
230
231
232
233
234
235
package com.spring;

import com.spring.annotations.Autowrited;
import com.spring.annotations.Component;
import com.spring.annotations.ComponentScan;
import com.spring.annotations.Scope;

import java.beans.Introspector;
import java.io.File;
import java.lang.reflect.Field;
import java.lang.reflect.InvocationTargetException;
import java.net.URL;
import java.util.ArrayList;
import java.util.HashMap;
import java.util.List;
import java.util.Map;

/**
* @author sunfy
* @version 1.0
* @className SunfyAppliction
* @Description
* @date 2021-9-4 21:20
*/
public class SunfyAppliction {

// 保存所有对象的一定定义信息
private HashMap<String, BeanDefinition> beanDefinitionMap = new HashMap<>();
private HashMap<String, Object> singletonMap = new HashMap<>();
private List<BeanPostProcessor> beanPostProcessorList = new ArrayList<>();

// 创建构造方法
public SunfyAppliction(Class configClass) {
//System.out.println(this.getClass().getName() + "构造方法开始运行!");
// 扫描路径下的class
scan(configClass);

//for (Map.Entry<String, BeanDefinition> entry : beanDefinitionMap.entrySet()) {
// String beanName = entry.getKey();
// BeanDefinition beanDefinition = entry.getValue();
// if (beanDefinition.getScope().equals("singleton")) {
//
// Object bean = createBean(beanName, beanDefinition);
// singletonMap.put(beanName, bean);
//
// }
//}
}

private void scan(Class configClass) {
// 判断当前闯入的类是否有ComponentScan注解
if (configClass.isAnnotationPresent(ComponentScan.class)) {
// 获得注解中配置的路径
ComponentScan componentScan = (ComponentScan) configClass.getAnnotation(ComponentScan.class);
String path = componentScan.value();
//System.out.println("配置文件路径" + path);
// 处理文件路径
path = path.replace(".", "/");
//System.out.println("配置文件路径替换后" + path);
// 获得ClassLoader
ClassLoader classLoader = SunfyAppliction.class.getClassLoader();
URL resource = classLoader.getResource(path);
//System.out.println("通过ClassLoader获取完整文件路径" + resource.getPath());
File file = new File(resource.getFile());

// 开始处理获取的文件
if (file.isDirectory()) {
for (File f :
file.listFiles()) {
String absolutePath = "";
if (f.isDirectory()) {
//System.out.println("当前问文件夹,跳过" + f.getName());
for (File f1 :
f.listFiles()) {
//System.out.println("获取到的文件为:" + f.getPath());
absolutePath = f1.getAbsolutePath();
//System.out.println("获取到的文件绝对路径为:" + absolutePath);
absolutePath = absolutePath.substring(absolutePath.indexOf("com"), absolutePath.indexOf(".class"));
absolutePath = absolutePath.replace("\\", ".");
//System.out.println("修改文件路径为:" + absolutePath);
loadClass(classLoader, absolutePath);
}
} else {
//System.out.println("获取到的文件为:" + f.getPath());
absolutePath = f.getAbsolutePath();
//System.out.println("获取到的文件绝对路径为:" + absolutePath);
absolutePath = absolutePath.substring(absolutePath.indexOf("com"), absolutePath.indexOf(".class"));
absolutePath = absolutePath.replace("\\", ".");
//System.out.println("修改文件路径为:" + absolutePath);
loadClass(classLoader, absolutePath);
}
}
} else {
System.out.println("当前路径不存在");
}
} else {
System.out.println("当前配置类不存在ComponentScan注解");
}
}

private void loadClass(ClassLoader classLoader, String absolutePath) {
// 准备通过类加载器加载文件
try {
Class<?> aClass = classLoader.loadClass(absolutePath);

if (aClass.isAnnotationPresent(Component.class)) {

// 判断是否有实现了BeanPostProcessor接口
if (BeanPostProcessor.class.isAssignableFrom(aClass)) {
BeanPostProcessor instance = (BeanPostProcessor) aClass.getConstructor().newInstance();
beanPostProcessorList.add(instance);
}

Component componentAnnotation = aClass.getAnnotation(Component.class);
if (componentAnnotation == null) {
System.out.println("该类没有添加Component注解,不处理");
return;
}
String beanName = componentAnnotation.value();
if ("".equals(beanName)) {
/*
获得一个字符串并将它转换成普通 java 变量名称大写形式的实用工具方法。
这通常意味着将首字符从大写转换成小写,但在(不平常的)特殊情况下,
当有多个字符且第一个和第二个字符都是大写字符时,不执行任何操作。
*/
beanName = Introspector.decapitalize(aClass.getSimpleName());
//System.out.println("没有配置value,自动获取的名字为:" + beanName);
}

// beanDefinition,Spring中很关键的一个概念
BeanDefinition beanDefinition = new BeanDefinition();
beanDefinition.setType(aClass);

// 根据Scope注解设置bean的属性
if (aClass.isAnnotationPresent(Scope.class)) {
Scope scope = aClass.getAnnotation(Scope.class);
String value = scope.value();
if ("".equals(value)) value = "singleton";
beanDefinition.setScope(value);
} else {
beanDefinition.setScope("singleton");
}

// 将bean放在一个缓存Map中供后续获取使用,此时只是放入了一个bean定义,并没有真正的创建bean对象
beanDefinitionMap.put(beanName, beanDefinition);
}

} catch (ClassNotFoundException e) {
e.printStackTrace();
} catch (IllegalAccessException e) {
e.printStackTrace();
} catch (InvocationTargetException e) {
e.printStackTrace();
} catch (NoSuchMethodException e) {
e.printStackTrace();
} catch (InstantiationException e) {
e.printStackTrace();
}
}

public Object getBean(String beanName) {
if (!beanDefinitionMap.containsKey(beanName)) {
// 不存在当前bean定义,抛出异常
throw new NullPointerException();
}
Object bean = null;
BeanDefinition beanDefinition = beanDefinitionMap.get(beanName);
// 根据Scope的属性创建bean
if ("singleton".equals(beanDefinition.getScope())) {
if (singletonMap.containsKey(beanName)) {
bean = singletonMap.get(beanName);
} else {
bean = createBean(beanName, beanDefinition);
singletonMap.put(beanName, bean);
}
} else {
bean = createBean(beanName, beanDefinition);
}
return bean;
}

public Object createBean(String beanName, BeanDefinition beanDefinition) {
Class type = beanDefinition.getType();
Object instance = null;
// 通过反射创建对象
try {
// 通过构造函数反射创建对象
instance = type.getConstructor().newInstance();
//System.out.println("基础对象创建成功");

// 实现依赖注入(属性赋值)
for (Field field :
type.getDeclaredFields()) {
//System.out.println("获取到的相关属性" + field.getName());
if (field.isAnnotationPresent(Autowrited.class)) {
field.setAccessible(true);
field.set(instance, getBean(field.getName()));
}
}

// 创建了bean之后,判断是否实现Aware接口,Spring一个重要的扩展点
//System.out.println("判断是否实现了Aware接口");
if (instance instanceof BeanNameAware) {
((BeanNameAware) instance).setBeanName(beanName);
}

// Bean的后置处理器(Spirng中AOP采用的就是这种实现方式)-初始化前
for (BeanPostProcessor beanPostprocessor :
beanPostProcessorList) {
instance = beanPostprocessor.postProcessBeforeInitialization(instance, beanName);
}

// 创建bean之后,判断bean是否实现了InitializingBean接口,这也是Spring的一个重要的扩展点
//System.out.println("判断是否实现了InitializingBean接口");
if (instance instanceof InitializingBean) {
((InitializingBean) instance).afterPropertiesSet();
}

// Bean的后置处理器(Spirng中AOP采用的就是这种实现方式)-初始化后
for (BeanPostProcessor beanPostprocessor :
beanPostProcessorList) {
instance = beanPostprocessor.postProcessAfterInitialization(instance, beanName);
}
} catch (InstantiationException e) {
e.printStackTrace();
} catch (IllegalAccessException e) {
e.printStackTrace();
} catch (InvocationTargetException e) {
e.printStackTrace();
} catch (NoSuchMethodException e) {
e.printStackTrace();
}
return instance;
}
}

总结

BeanPostProcessor:这属于面向切面的扩展,针对具有默写共同点的类进行统一的扩展。

Aware:面向实现指定接口的类进行扩展。

InitializingBean:面向实现指定接口的类进行扩展。

BeanDefinition

表示Bean定义,BeanDefinition中存在很多属性用来描述一个Bean的特点。通常使用Bean标签(<Bean/>)、@Bean注解@Component(@Service、@COntroller)等方式来声明一个bean,以上几种方式统称为申明式定义Bean,同时还可以使用编程式定义Bean,在Spring源码中更多的都是通过BeanDefinition来编程式的创建bean的。

BeanDefinitionReader

Spring源码中提供的BeanDefinition读取器,这些我们通常不会使用到,但是在Spring源码中使用的很多。AnnotatedBeanDefinitionReaderXmlBeanDefinitionReader等。

ClassPathBeanDefinitionScanner

扫描器,作用和BeanDefinitionReader类似,可以进行扫描,扫描某个包的路径,对扫描到的类进行解析。

BeanFactory

表示Bean工厂,负责创建Bean,并且提供获取Bean的API。IOCbean工厂的顶级接口 定义一系列对bean的操作。

image-20210906110715684

ApplicationContextBeanFactory的一种,在Spring源码中,是这么定义的:

image-20210906110841507

首先,在Java中,接口是可以多继承的,我们发现ApplicationContext继承了ListableBeanFactoryHierarchicalBeanFactory,而ListableBeanFactoryHierarchicalBeanFactory都继承至BeanFactory,所以我们可以认为ApplicationContext继承了BeanFactoryApplicationContext也是BeanFactory的一种,拥有BeanFactory支持的所有功能,不过ApplicationContextBeanFactory更加强大,ApplicationContext还继承了其他接口,也就表示ApplicationContext还拥有其他功能,

比如

  • MessageSource表示国际化,
  • ApplicationEventPublisher表示事件发布,
  • EnvironmentCapable表示获取环境变量,等等,关于ApplicationContext后面再详细讨论。

在Spring的源码实现中,当我们new一个ApplicationContext时,其底层会new一个BeanFactory出来,当使用ApplicationContext的某些方法时,比如getBean(),底层调用的是BeanFactorygetBean()方法。

在Spring源码中,BeanFactory接口存在一个非常重要的实现类是:DefaultListableBeanFactory,也是非常核心的。

所以,我们可以直接来使用DefaultListableBeanFactory,而不用使用ApplicationContext的某个实现类,比如:

1
2
3
4
5
6
7
8
DefaultListableBeanFactory beanFactory = new DefaultListableBeanFactory();

AbstractBeanDefinition beanDefinition = BeanDefinitionBuilder.genericBeanDefinition().getBeanDefinition();
beanDefinition.setBeanClass(User.class);

beanFactory.registerBeanDefinition("user", beanDefinition);

System.out.println(beanFactory.getBean("user"));

DefaultListableBeanFactory是非常强大的,支持很多功能,可以通过查看DefaultListableBeanFactory的类继承实现结构来看
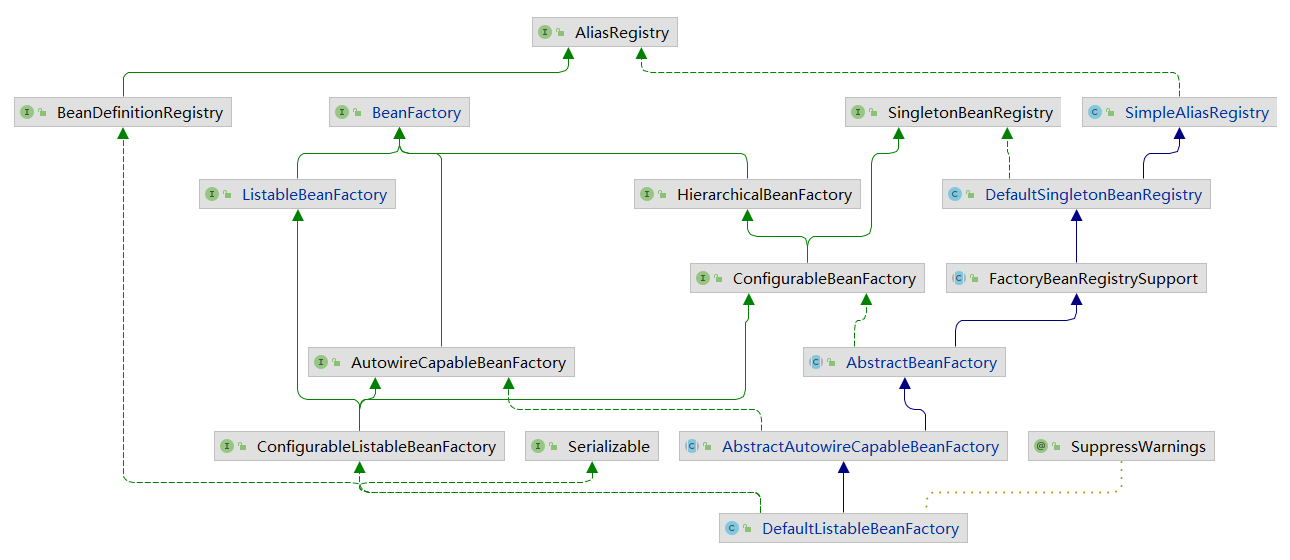
image-20210906110428991

它实现了很多接口,表示,它拥有很多功能:

  1. AliasRegistry:支持别名功能,一个名字可以对应多个别名
  2. BeanDefinitionRegistry:可以注册、保存、移除、获取某个BeanDefinition
  3. BeanFactory:Bean工厂,可以根据某个bean的名字、或类型、或别名获取某个Bean对象
  4. SingletonBeanRegistry:可以直接注册、获取某个单例Bean
  5. SimpleAliasRegistry:它是一个类,实现了AliasRegistry接口中所定义的功能,支持别名功能
  6. ListableBeanFactory:在BeanFactory的基础上,增加了其他功能,可以获取所有BeanDefinitionbeanNames,可以根据某个类型获取对应的beanNames,可以根据某个类型获取{类型:对应的Bean}的映射关系
  7. HierarchicalBeanFactory:在BeanFactory的基础上,添加了获取父BeanFactory的功能
  8. DefaultSingletonBeanRegistry:它是一个类,实现了SingletonBeanRegistry接口,拥有了直接注册、获取某个单例Bean的功能
  9. ConfigurableBeanFactory:在HierarchicalBeanFactorySingletonBeanRegistry的基础上,添加了设置父BeanFactory、类加载器(表示可以指定某个类加载器进行类的加载)、设置Spring EL表达式解析器(表示该BeanFactory可以解析EL表达式)、设置类型转化服务(表示该BeanFactory可以进行类型转化)、可以添加BeanPostProcessor(表示该BeanFactory支持Bean的后置处理器),可以合并BeanDefinition,可以销毁某个Bean等等功能
  10. FactoryBeanRegistrySupport:支持了FactoryBean的功能
  11. AutowireCapableBeanFactory:是直接继承了BeanFactory,在BeanFactory的基础上,支持在创建Bean的过程中能对Bean进行自动装配
  12. AbstractBeanFactory:实现了ConfigurableBeanFactory接口,继承了FactoryBeanRegistrySupport,这个BeanFactory的功能已经很全面了,但是不能自动装配和获取beanNames
  13. ConfigurableListableBeanFactory:继承了ListableBeanFactoryAutowireCapableBeanFactoryConfigurableBeanFactory
  14. AbstractAutowireCapableBeanFactory:继承了AbstractBeanFactory,实现了AutowireCapableBeanFactory,拥有了自动装配的功能
  15. DefaultListableBeanFactory:继承了AbstractAutowireCapableBeanFactory,实现了ConfigurableListableBeanFactory接口和BeanDefinitionRegistry接口,所以DefaultListableBeanFactory的功能很强大

ApplicationContext

ApplicationContext是一个接口,实际上也是一个BeanFactory,不过相较于BeanFactory更为强大。

  1. HierarchicalBeanFactory:拥有获取父BeanFactory的功能
  2. ListableBeanFactory:拥有获取beanNames的功能
  3. ResourcePatternResolver:资源加载器,可以一次性获取多个资源(文件资源等等)
  4. EnvironmentCapable:可以获取运行时环境(没有设置运行时环境功能)
  5. ApplicationEventPublisher:拥有广播事件的功能(没有添加事件监听器的功能)
  6. MessageSource:拥有国际化功能

两个比较重要的实现类

AnnotationConfigApplicationContext

image-20210906110040192

  1. ConfigurableApplicationContext:继承了ApplicationContext接口,增加了,添加事件监听器、添加BeanFactoryPostProcessor、设置Environment,获取ConfigurableListableBeanFactory等功能
  2. AbstractApplicationContext:实现了ConfigurableApplicationContext接口
  3. GenericApplicationContext:继承了AbstractApplicationContext,实现了BeanDefinitionRegistry接口,拥有了所有ApplicationContext的功能,并且可以注册BeanDefinition,注意这个类中有一个属性(DefaultListableBeanFactory beanFactory)
  4. AnnotationConfigRegistry:可以单独注册某个为类为BeanDefinition(可以处理该类上的@Configuration注解,已经可以处理@Bean注解),同时可以扫描
  5. AnnotationConfigApplicationContext:继承了GenericApplicationContext,实现了AnnotationConfigRegistry接口,拥有了以上所有的功能

ClassPathXmlApplicationContext
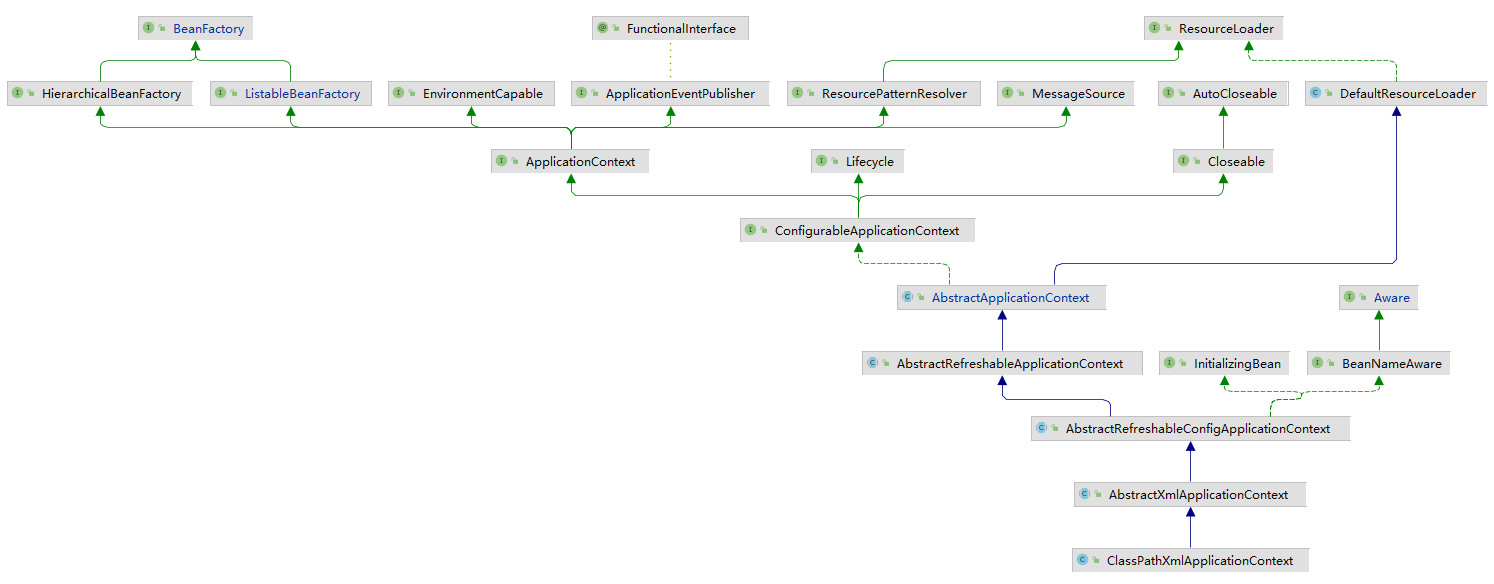
image-20210906110239801

也是继承了AbstractApplicationContext,但是相对于AnnotationConfigApplicationContext而言,功能没有AnnotationConfigApplicationContext强大,比如不能注册BeanDefinition

国际化

(MessageSource)

资源加载

可以直接利用ApplicationContext获得某个文件的内容

获取运行时环境

事件发布

类型转化

在Spring源码中,有可能需要把String转换成其他类型,所以在Spring源码中提供了一些技术来更方便的对对象进行类型转化

PropertyEditor:JDK中提供的类型转化工具类

ConversionService:Spring中提供的类型转化服务,比propertyEditor更强大

TypeConverter:整合了上面两个功能,Spring源码中使用的

OrderComparator

是Spring所提供的一种比较器,可以用来根据@Order注解或实现Ordered接口来执行比较从而进行排序的工具类。

另外,Spring中还提供了一个OrderComparator的子类:AnnotationAwareOrderComparator,它支持用@Order来指定order值。

BeanPostProcessor

表示Bean的后置处理器,我们可以定义一个或多个BeanPostProcessor

BeanFactoryPostProcessor

表示bean工厂的后置处理器,其实和BeanPostProcessor类似,BeanPostProcessor是干涉Bean的创建过程,BeanFactoryPostProcessor是干涉BeanFactory的创建过程。

FactoryBean

上面提到的BeanPostProcessor是用来干涉Bean的创建过程,但是如果我们想让一个Bean完全由我们来创建,也是可以的,可以通过FactoryBean来创建,这样创建出来的bean不会经过完成的Bean的生命周期,只会经过初始化后,其他的依赖注入等是不会经过的。

通过FactoryBean创建的bean和我们常用的申明式创建的bean主要区别在于是否有完整的Spring的生命周期,自然申明式创建的bean是具备完整的生命周期的。

ExcludeFilterIncludeFileter

这两个过滤器是Spring扫描过程中用来过滤的,见名知意,ExcludeFilter表示排除过滤器,IncludeFileter表示包含过滤器。

在Spring的扫描逻辑中,默认会添加一个AnnotationTypeFilterincludeFilters,表示默认情况下Spring扫描过程中会认为类上有@Component注解的就是Bean。

MetadataReaderClassMetadataAnntationMetadata

在Spring中需要取解析类的信息,比如类名、类中的方法、类上的注解等信息,这些都称之为类的元数据,Spring中对上述信息做了一些封装,提供了一些工具类,可以很方便的获取元数据信息。

SimpleMetadataReader解析类的时候,使用的是ASM技术

为什么要使用ASM技术呢?

Spring启动的时候需要去扫描,如果指定的包路径比较宽泛,那么扫描的类是非常多的,那如果在Spring启动的时候就把这些类全部加载进JVM中,这样不太好,就使用了ASM

扩展:

ASM技术:ASM 是一个 Java 字节码操控框架。它能被用来动态生成类或者增强既有类的功能。ASM 可以直接产生二进制 class 文件,也可以在类被加载入 Java 虚拟机之前动态改变类行为。ASM 从类文件中读入信息后,能够改变类行为,分析类信息,甚至能够根据用户要求生成新类。


Copyright 2021 sunfy.top ALL Rights Reserved

...

...

00:00
00:00